Documentation
Install
Download the latest war file and deploy it to your favourite servlet container. The latest build is tested on Tomcat 6.0.20 but there is no reason why it would have problems on any 2.4 compliant servlet container.
Because of the way the flex aplication swf is compiled, you will need to deploy express to the root of your domain. There are many ways to achieve this; you can setup a virtual host on apache and reverse-proxy through to the Tomcat instance where express is running, or use jk_mount to similar effect. Describing exactly how to achieve this is beyond the scope of this document. The simplest scenario is to deploy to Tomcat direcly as the ROOT application. This means moving the tomcat default ROOT application out of the webapps directory, unzipping the application war in the webapps directory and renaming it ROOT.
Express requires a relational database. By default it uses postgres and was developed against 8.4. It will work against most relational databases as persistence is done via JPA and database management through Liquibase. Express ships with drivers and configuration for Postgres and MySQL for other databases users need to add the database driver to the lib directory and change the properties to suit the new database driver (see config section below).
Express needs access to an SMTP server in order to send registration confirmation emails and other notification. Details for configuring the SMTP server are in the config section below.
Configure
Most configuration is done in the application.properties file which is located in the exploded war file under theWEB-INF/classes folder. At a minimum you will need to add the properties for your smtp server. Without an smtp server you cannot register, as Express sends a confirmation email to ensure that the user has a valid email address. You will also need to change the entry for the applicationUrl to your domain name as the link in the confirmation email uses this.
Database Configuration
As mentioned above, Express can support Postgres or MySQL via simple properties changes. The properties file (shown in the image below) is configured for the default database type (postgres). The MySQL and HSQL configuration entries are commented out with '#' signs at the beginning of the line. The database name is express, this is configured as the last item on the persistence.db.url line. The item before that is the hostname where the database is. In the example below it is 'localhost' this is because the database is on the same server as the application is running. It can be changed to another hostname or IP number.
Configuring the username and password for the database should be self-evident. The database user needs to have permission to create, drop and alter tables. If in doubt and you are running express in isolation on your local computer, you can just set the user to the default database administrator (postgres on the Postgres database and root on MySQL). This user has sufficient permissions but is not secure to use on a publicly accessble server.

SMTP (mail) Configuration
This configuration item gets more help requests than any other item in the install/configure process so please read this section carefully before you install express. The hostname of your SMTP server should be entered in the'mail.host' field. You can enter the IP number or the hostname but whatever you enter needs to be reachable from the server where Express is installed. The easiest way to check this is to open up a command prompt and type:
> telnet mail.yourdomain.com 25
You should get an EHLO response from the server. The example above is using the values set in the example application.properties file above with 'mail.host' set to mail.yourdomain.com and 'mail.port' set to 25.
The username and password fields will be ignored unless 'mail.authenticate' is set to true. If authentication is required for you SMTP server to send for you then set this field to true and enter values into the 'mail.username' and 'mail.password' fields. These should match whatever you use in your mail client to authenticate for sending.
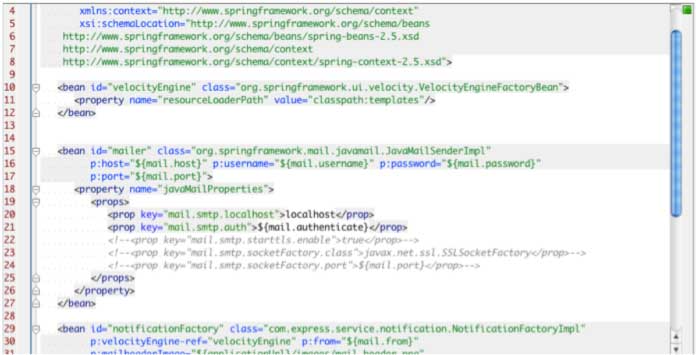
Some servers, such as google, require you to connect and authenticate over SSL. In this case some further editing needs to be done in the applicationContextNotification.xml file shown below.

Uncomment the 3 lines commented out above. For those unfamiliar with XML commenting, uncomment means removing the !—characters directly after the < at the beginning of the line and the -- characters directly before the > at the end of the line.
Use
Register
The fist thing you will need to do is register a user account. User registration can be reached from the link on the login page. An email, password, and password hint is all that is required but additional details such as the colour you want to see for your stories / tasks, your full name and contact phone can be added also to help others in your team(s) identify you.
After registering, an email with a confirmation link will be sent to the email address provided. This link will need to be used in order to activate the account. After this is done you can login.
Create a project
On your first login you will be directed to the project creation / access page. Here you can create a project or request to join an existing one. Your request will be emailed to the project manager(s) immediately but you will not actually get access to their project until they have acted on the request. If you create a new project it will be setup immediately and you can go to work on it straight away.
When you create a project you automatically become its manager. This means you receive all requests to join the project and can approve or reject them.